


りゅーそう
元高校地歴科教員。現在microCMSでエンジニアをしています。
Saitama.jsというLT会を運営中です。
発言はすべて個人の意見です。
firebase
2020/08/31
2022/01/23
今回はFirebaseAuthで認証を実装し、そのユーザーデータをFirestoreに保存する実装ができたので共有しようと思います。
意外とこの組み合わせで実装している例がネット上には見られませんでした(あんまりFirestoreにユーザーデータとか入れないのかな?)。
今回は以下の記事にだいぶ助けられました。
Firebaseの存在をフロントエンドから隠蔽するために
特に、
・FirebaseのConfigを含む、クラスを作成する。
・認証の判定
を参考にさせていただきました。上記リンクより見てみてください。
認証の際には参考記事のようにContextAPIでユーザー情報(uidのみ)をグローバルでもち、useEffectで判定するという方法を用いています。
また、以下の書籍はFirestoreの使用方法、設計に関してとても参考にさせていただきました(読み応えあるため、まだまだ全然理解できていませんが)。
実践Firestore
サンプルはReact(Next.js)×TypeScriptで実装しています。ただ、ライブラリに依存する部分は少ないので、他のライブラリをご使用の場合でも参考になるかと思います。
Firebaseのヴァージョンは7.18.0です。
またFormの作成に、react-hook-form(v6.4.1)を使用しています。
デザインはMaterial-UIを使用していますが、デザインについては解説しません。
では実際に実装を進めていきます。
Firebaseコンソールに行き、プロジェクトのセットアップを行ってください。APIKEY等が必要になるのでメモしておきます。
configの設定は以下の記事を参照してください。
Firebaseの存在をフロントエンドから隠蔽するために
  firebase.initializeApp({
      apiKey: 'AIzaSyDYBCHQpTBORva2PoTRq-e9zx5AOzArzRY',
      authDomain: 'senseitime-f8747.firebaseapp.com',
      databaseURL: 'https://senseitime-f8747.firebaseio.com',
      projectId: 'senseitime-f8747',
      storageBucket: 'senseitime-f8747.appspot.com',
      messagingSenderId: '1075269388866',
      appId: '1:1075269388866:web:4fea69d8583fd2c9a5bbdb',
      measurementId: 'G-76E0XKQD47',
    });
上記のような値を設定します。自身のFirebaseコンソールで取得した値を設定してください。
firebaseのAPIは公開しても問題ありません。
contextAPIを使用してグローバルストアでユーザー情報を管理します。
サンプルはNext.jsなので_app.tsxに以下のようにしてcreateContextで状態を管理します。
import React from 'react';
import Head from 'next/head';
import { AppProps } from 'next/app';
import 'firebase/auth';
import { useState, createContext, Dispatch, SetStateAction } from 'react';

export const AuthContext = createContext<{
  uid: string | null;
  setUid: Dispatch<SetStateAction<string | null>>;
}>(null);

const App = ({ Component, pageProps }: AppProps) => {
  const [uid, setUid] = useState<string | null>(null);

  return (
    <>
      <Head>
        <title>タイトル</title>
        <meta
          name="viewport"
          content="minimum-scale=1, initial-scale=1, width=device-width"
        />
      </Head>

      <AuthContext.Provider value={{ uid, setUid }}>
        <Component {...pageProps} />
      </AuthContext.Provider>

    </>
  );
};
あとはuidがsetされているか否かに応じて表示させるコンポーネントを切り替えれば実装は完了です。
ReactであればuseEffectを使用して、画面のレンダリング時にuidの有無を判定する。またはReduxやContextを使用して状態を管理するなどの方法があるかと思います。
自分は上記の参考リンクのようにページごとにuseEffectを呼び出すことで判定を行いました。
  return (
    <>
      {auth.uid ? (
        <Layout>
   <h1>Home</h1>
        </Layout>
      ) : (
        <SignUp />
      )}
    </>
  );
詳しくは上記参考リンクを参照してください。
ここからがこの記事の本題です。実際にまずはGoogleログイン機能を実装していきます。
以下、Googleログインを実行する関数になります。
loginWithGoogle: async (): Promise<
    firebase.firestore.DocumentReference<firebase.firestore.DocumentData>
  > => {
    const provider = new firebase.auth.GoogleAuthProvider();
    const userCredential = await firebase.firestore().auth().signInWithPopup(
      provider
    );
    const userRef = firebase.firestore().db().doc(
      `users/${userCredential.user?.uid}`
    );
    const snapShot = await userRef.get();
    if (!snapShot.exists) {
      const uid = userCredential?.user?.uid;
      const displayName = userCredential?.user?.displayName;
      const createdAt = new Date();
      try {
        await userRef.set({
          uid,
          displayName,
          createdAt,
        });
      } catch (e) {
        console.error(e);
        throw new Error('login失敗した');
      }
    }
    return userRef;
  },
ポイント:
1.返り値はDocumentReference型を使用する
firestoreが持つ型をPromiseの返り値に設定します。
2.Googleログインの際にはGoogleAuthProviderを使用する
signInWithPopを使用すると表準的なGoogleログインのUIが簡単に実装できます。詳しくはドキュメントにて
3.Firestoreの操作
Firebaseコンソールにてドキュメントを追加してみましょう。
コレクションを追加よりusersを追加します。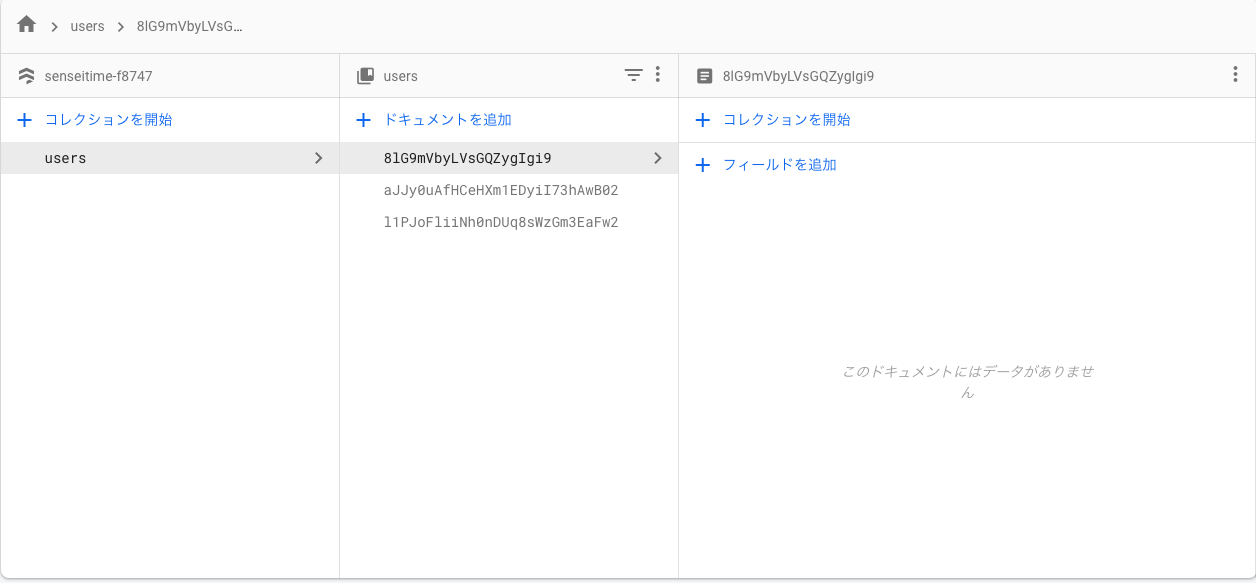
以下のコードはusers配下のuid(自動生成されるid)を参照するコードになります。getで取得しアクセスすることができます。
 const userRef = firebase.firestore().db().doc(
      `users/${userCredential.user?.uid}`
    );
 const snapShot = await userRef.get();
このuidに値を追加します。
先ほどのGoogleProviderで取得した値をsetします。
firestoreにはなるべくemailなどの個人情報を持たないようにします。持つ場合はドキュメントを分け、セキュリティルールを分ける必要があります。
ここではログインに必要なuidを取得し、setします。
  if (!snapShot.exists) {
      const uid = userCredential?.user?.uid;
      const displayName = userCredential?.user?.displayName;
      const createdAt = new Date();
      try {
        await userRef.set({
          uid,
          displayName,
          createdAt,
        });
      } catch (e) {
        console.error(e);
        throw new Error('login失敗した');
      }
    }
この関数を使う際は以下のようにイベントで呼び出します。
     <CustomButton
        text="Googleアカウントで登録"
        color={theme.palette.secondary.main}
        backgroundColor={theme.palette.primary.contrastText}
        hoverColor={theme.palette.secondary.light}
        event={SessionRepository.loginWithGoogle}
        className={classes.button}
      />
Customボタンコンポーネント(Material-UI)
import React from 'react';
import { Button, Typography } from '@material-ui/core';
import { makeStyles } from '@material-ui/core/styles';

type Props = {
  text: string;
  event?(): void;
  type?: 'button' | 'submit' | 'reset';
  className?: string;
};

type StyleProps = {
  color: string;
  backgroundColor: string;
  hoverColor?: string;
};

type ButtonProps = Props & StyleProps;

const useStyles = makeStyles({
  root: {
    '& button': {
      paddingLeft: '20px',
      paddingRight: '20px',
      color: (props: StyleProps) => props.color,
      backgroundColor: (props: StyleProps) => props.backgroundColor,
    },
    '& button:hover': {
      backgroundColor: (props: StyleProps) => props.hoverColor,
    },
    '& p': {
      fontWeight: 'bold',
      padding: '2px',
    },
  },
});

export const CustomButton: React.FC<ButtonProps> = ({
  text,
  event,
  type,
  className,
  color,
  backgroundColor,
  hoverColor,
}) => {
  const props = {
    backgroundColor: backgroundColor,
    color: color,
    hoverColor: hoverColor,
  };
  const classes = useStyles(props);
  return (
    <div className={classes.root}>
      <Button onClick={event} type={type} className={className}>
        <Typography>{text}</Typography>
      </Button>
    </div>
  );
};
シンプルに呼び出せるのが良いですね。
基本的にはGoogleログインと実装方法は一緒になります。
  SignUpWithEmailAndPassword: async (
    email: string,
    password: string
  ): Promise<
    firebase.firestore.DocumentReference<firebase.firestore.DocumentData>
  > => {
    const userCredential = await firebase.firestore().auth().createUserWithEmailAndPassword(
      email,
      password
    );
    const userRef = firebase.firestore().db().doc(
      `users/${userCredential.user?.uid}`
    );
    const snapShot = await userRef.get();
    if (!snapShot.exists) {
      const uid = userCredential?.user?.uid;
      const displayName = userCredential?.user?.displayName;
      const createdAt = new Date();
      try {
        await userRef.set({
          uid,
          displayName,
          createdAt,
        });
      } catch (e) {
        console.error(e);
        throw new Error('登録失敗しました');
      }
    }
    return userRef;
  },
異なる部分のみ解説します。Email&passwordを使用したSignUpを実装する場合はcreateUserWithEmailAndPasswordを使用します。Propsのemailとpasswordを与えます。あとはGoogleログインと処理は同じです。
  const userCredential = await firebase.firestore().auth().createUserWithEmailAndPassword(
      email,
      password
);SignUpと同じです。ただ、ログインの際にはsignInWithEmailAndPasswordを使用します。
const userCredential = await firebase.firestore().auth().signInWithEmailAndPassword(
      email,
      password
)蛇足ですが、コードを貼っておきます。
ポイントはreact-hook-formでemailとpasswordの値を受け取って、先ほど作成したメソッドに渡しているところです。
import React from 'react';
import { useForm, Controller } from 'react-hook-form';

import {
  Input,
  FormControl,
  FormHelperText,
  InputLabel,
  InputAdornment,
  IconButton,
  Grid,
} from '@material-ui/core';
import {
  useTheme,
  makeStyles,
  createStyles,
  Theme,
} from '@material-ui/core/styles';

import { Visibility, VisibilityOff } from '@material-ui/icons';
import { Layout } from '../components/layout';
import { Login } from '../components/templates/login';
import { CustomButton } from '../components/atoms/CustomButton';
import { SessionRepository } from '../firebase/repository/session';

type FormData = {
  email: string;
  password: string;
  submit: string;
};

type State = {
  password: string;
  showPassword: boolean;
};

const useStyles = makeStyles((theme: Theme) =>
  createStyles({
    root: {
      '& .submitButton': {
        marginTop: '24px',
      },
      '& div': {
        '& span[role="alert"]': {
          color: theme.palette.error.main,
        },
      },
    },
    button: {
      marginTop: '16px',
      border: `1px solid ${theme.palette.secondary.main}`,
    },
  })
);

const SignUp: React.FC = () => {
  const classes = useStyles();
  const theme = useTheme();
  const { handleSubmit, errors, control } = useForm<FormData>({
    criteriaMode: 'all',
  });

  const [values, setValues] = React.useState<State>({
    password: '',
    showPassword: false,
  });

  const handleClickShowPassword = () => {
    setValues({ ...values, showPassword: !values.showPassword });
  };

  const handleMouseDownPassword = (
    event: React.MouseEvent<HTMLButtonElement>
  ) => {
    event.preventDefault();
  };

  const onSubmit = handleSubmit((data: FormData) => {
    SessionRepository.SignUpWithEmailAndPassword(data.email, data.password);
  });

  return (
    <Layout>
      <h1>登録してログイン</h1>
      <form onSubmit={onSubmit} className={classes.root}>
        <FormControl fullWidth>
          <InputLabel htmlFor="standard-adornment-password">Email</InputLabel>
          <Controller
            as={Input}
            name="email"
            control={control}
            defaultValue=""
            rules={{
              required: 'メールアドレスは必須項目です',
              pattern: {
                value: /^[A-Z0-9._%+-]+@[A-Z0-9.-]+\.[A-Z]{2,}$/i,
                message: '無効な値です。',
              },
            }}
          />
          {errors.email?.type === 'required' && (
            <span role="alert">メールアドレスは必須項目です</span>
          )}
          {errors.email?.type === 'pattern' && (
            <span role="alert">正しい形式で入力してください</span>
          )}
          <FormHelperText>メールアドレスを入力してください。</FormHelperText>
        </FormControl>
        <FormControl fullWidth>
          <InputLabel htmlFor="standard-adornment-password">
            Password
          </InputLabel>
          <Controller
            as={Input}
            name="password"
            control={control}
            type={values.showPassword ? 'text' : 'password'}
            defaultValue=""
            value={values.password}
            rules={{
              required: 'Required',
              pattern: {
                value: /(?=.*\d)(?=.*[a-z])(?=.*[A-Z]).{8,}/,
                message: '無効な値です。',
              },
            }}
            endAdornment={
              <InputAdornment position="end">
                <IconButton
                  aria-label="toggle password visibility"
                  onClick={handleClickShowPassword}
                  onMouseDown={handleMouseDownPassword}
                >
                  {values.showPassword ? <Visibility /> : <VisibilityOff />}
                </IconButton>
              </InputAdornment>
            }
          />
          {errors.password?.type === 'required' && (
            <span role="alert">パスワードは必須項目です</span>
          )}
          {errors.password?.type === 'pattern' && (
            <span role="alert">
              8文字以上かつアルファベットの大文字・小文字、数字を含めてください
            </span>
          )}
          <FormHelperText>
            8文字以上かつアルファベットの大文字・小文字、数字を含めてください
          </FormHelperText>
        </FormControl>
        <Grid className="submitButton">
          <CustomButton
            type="submit"
            text="登録"
            color={theme.palette.primary.contrastText}
            backgroundColor={theme.palette.secondary.main}
            hoverColor={theme.palette.secondary.light}
          />
        </Grid>
      </form>
      <CustomButton
        text="Googleアカウントで登録"
        color={theme.palette.secondary.main}
        backgroundColor={theme.palette.primary.contrastText}
        hoverColor={theme.palette.secondary.light}
        event={SessionRepository.loginWithGoogle}
        className={classes.button}
      />
      <Login />
    </Layout>
  );
};

export default SignUp;
気が向いたら、react-hook-formの記事も書いてみようと思います。
以上です。
最後まで読んでいただきありがとうございました。
正直Firebase自信ないので、Twitter等でコメントいただけると嬉しいです。
りゅーそう
元高校地歴科教員。現在microCMSでエンジニアをしています。
Saitama.jsというLT会を運営中です。
発言はすべて個人の意見です。